DIY Beach-Inspired Kitchen Cabinet Remodel for Under $200: Step-by-Step Guide
After buying our home in San Diego last year—as detailed in our post, 5 Reasons NOT to Quit Your Job to Travel—we reignited our passion for DIY projects. With travel as our priority, we focus on budget-friendly home updates that evoke a beach and adventure theme without derailing our plans.
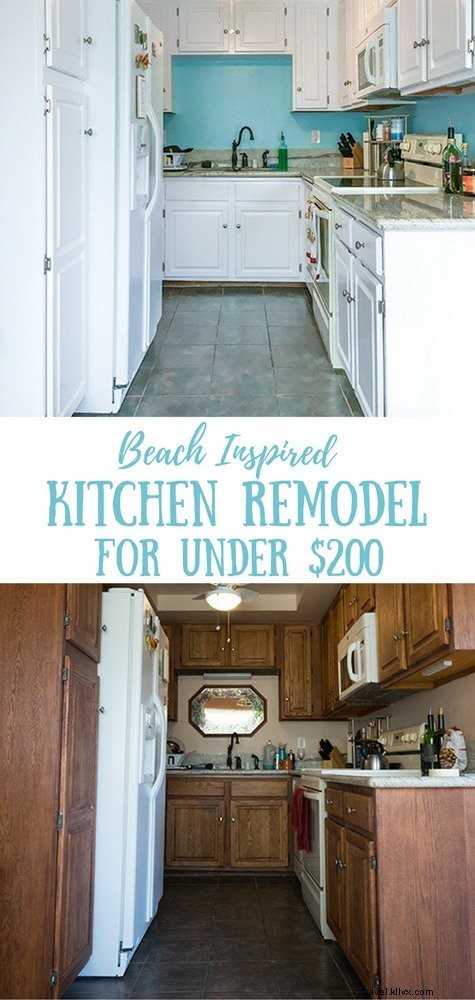
Our small kitchen needed brightening, but major renovations like new cabinets were out of reach. Instead, a fresh paint job delivered dramatic results. Inspired by coastal vibes, we chose crisp white cabinets accented with turquoise backsplash for an ocean pop of color. Despite limited natural light and no window, the space now feels incredibly brighter and more inviting.
We tackled this project between international trips, painting cabinets, backsplash, and ceiling (goodbye, dated pink!). It spanned a month, but with full focus, you could finish cabinets in five days. For sanity, break it into stages.
List of Supplies
- Plastic drop cloth
- Krud Kutter
- Sandpaper or deglosser
- Rags
- Painter’s tape (FrogTape recommended)
- Small roller & cover
- Nylon brush (for grooves)
- Roller tray
- Stir stick
- Pouring spout
- Painter’s pyramid stands
- Stain-blocking primer (KILZ MAX)
- Paint
- New hinges and knobs (if needed)
- Mini razor scraper (for old bumpers)
- New felt pad bumpers
Step 1: Remove Cabinet Doors
Label doors and interiors with masking tape for reassembly. Bag hardware in Ziploc bags to avoid losing pieces.
Step 2: Empty and Protect Interiors
Remove contents if messy; we taped wall-adjacent areas. FrogTape with a damp cloth press prevents bleed—superior to other tapes.
Step 3: Prepare Surfaces
Prep is key. Skip toxic TSP; use Krud Kutter for degreasing. For dark stains, deglosser outperforms sanding. Wipe with damp cloth, then tack cloth to remove dust before priming.
Step 4: Apply Primer
Use pyramid stands for airflow. KILZ MAX excels at stain-blocking without harsh fumes.
Step 5: Paint
Apply 2+ coats of alkyd semi-gloss enamel (cabinet-specific for durability and easy cleaning). Allow 4+ hours between coats. Prep prevents bleed-through.
Step 6: Install Hardware
Replace worn hinges; clean and polish old knobs. Match hinges precisely—may require drilling. Add felt bumpers before rehanging to protect paint.
Step 7: Rehang Doors
Wait 7+ days (full cure: 21-30 days) to minimize chips. Three months later, ours wipe clean effortlessly with a damp cloth.
Step 8: Enjoy Your Revamped Kitchen
The brighter palette inspires cooking—no new lights needed. A sink mirror mimics a window, bouncing light in our compact space.
Cost Breakdown
Primer/paint: ~2 gallons each. Existing tools saved costs; add plastic/newspaper protection. Paint & supplies: $125 + hinges: $68 = Total: $193